PLANS FOR THIS PROJECT:
If you are interested in building your own version of this project, I have a set of detailed plans available for purchase for a modest price. (As a bonus, this also includes plans for a matching tall mission dresser.)
This includes Measured Drawings, 3-D plans, as well as the Sketchup file I designed and used to build this project. Read More... »

I had been working on this design for a nightstand for over six months before I finally got around to actually building it. I knew the dimensions and the style, but I had not made any plans about how I was going to build it.
I often work like this. I will design something in sketchup and work on the look of it, but will not do any work at all on the joinery. I then usually just implement the joinery on the fly while building.
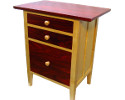
For this particular nightstand, I wanted something with a mission style. I also wanted lots of storage -- hence the four drawers. I know that the legs are probably not proper mission style, but I really like the curve.

When I finally got around to preparing to build the project I decided to take a different approach to the build. I had built another nightstand (for my wife) fairly recently using raised panels and other "traditional" woodworking methods. For this project, I decided to try to make the build as simple as possible, while still preserving the look of the piece.
So I started with a simple plywood box. The two sides are oak hardwood plywood. The crossbraces are also small strips of oak plywood. And the back panel is also 1/4" oak plywood.

The box is assembled with simple butt joints and pocket-hole joinery, as well as basic ordinary screw joints.

The back is attached early in the process, because the legs will be wrapping around the corners, trapping the back in place.

I made a template for the legs out of 1/4" plywood.

The legs have a fairly gentle curve, so I cut the curves with my my widest bandsaw blade. This gives a nice clean cut, and stays pretty straight.

The inside of the legs has a deep rabbet along the full length. This rabbet will cover the fasteners on the side of the cabinet. On the front side, the rabbet allows the leg to wrap full around the edge of the plywood and hide the ugly edge of the plywood.

I then cut 1/4" hardwood strips which were fitted and glued along the front edge of all the crosspieces.

This is the look I was looking for. The leg wraps around the side of the plywood box, and the trim covers the crosspieces. All evidence of this being a plywood box is almost entirely hidden.

The top is laminated from some thick ash planks. I had some 6/4 hardwood stock available, so after jointing and planing I had a top that was almost 1-1/4" thick, which is a lovely solid and substantial top.

The finaly step in camouflaging the plywood box is to cover over those large plain sides. I prepared some more thin strips of hardwood. These were one quarter inch thick (thin) but three inches wide.

These trim strips where then fitted and glued to the sides to give the appearance of a double raised panel. Glueing the middle strip was kind of tricky. The red arrows indicate how I built up some blocks in the middle, so that the clamps could apply pressure to the middle strips.

I'm totally skipping over the process of building the drawers in this article. You can see some of the drawer process in the above video. Or, if you want to read about it in detail you can see this article which I published a few months ago about the process I used to build drawers using a small drawer lock bit.

At this point I took the cabinet apart... The top was still loose, so that was easy. I removed the drawers, removed the drawer pulls, removed the drawer faces, and removed the slide hardware from the drawers. Then I sanded the entire project, cleaned off the dust, and applied several coats of polyurethane to the exterior of the nightstand. The drawers were sprayed with some shellac as a sealcoat -- I almost never put finish on the inside of drawers, due to how long the scent lingers. Shellac is one exception, as it has virtually no scent once dry.
The rest of this page is a small photo album of photos of my completed nightstand project.


Some of the Tools/Supplies Used In This Project: (Affiliate Links)
Painter's Pyramids
Hitachi 10.8V Tools
SensGard ZEM hearing protection
Kreg Pocket Hole Clamp
Kreg Pocket Hole Jig
(I have older versions of these Kreg tools)
Irwin Quick Grip XP600 Clamps
Grizzly G0513ANV 2HP Bandsaw
Lee Valley Classic Collection drawer pull hardware
(The Lee Valley item is a non-affiliate link.)
As an Amazon Associate I earn from qualifying purchases you make using my affiliate links.
Remember, click this link for information as to how you can purchase a set of plans for building your own version of this project.
ALSO -- six months after building this nightstand I built a matching tall mision dresser (check out that link for details!). Plans for that are included in the above plan package.